Tuesday, 18 September 2012

I passed! - Arts for Health & Wellbeing


 Readers of my other (more business-y) blog, Hue & Dye, may have seen that I recently passed my Arts for Health and Wellbeing course. Squee!

As part of the course which was run by Bolton University, we were asked to produce a series of pieces for a public exhibition at the end of the course. This was the brief for the exhibition.... (apologies for the blurry photo of the exhibition intro - no idea what happened there!)


I focussed my part of the exhibition on felting and made a series of felted pieces to express the personal creative journey I had taken during the course.


 For me, felt is such a tactile media - it has so many applications. How many products can there be that can be made soft enough to wear close to your skin, diaphanous, delicate and lacy like my merino/silk scarf, but can also be moulded into three dimensions to make the warmest, cosiest footwear like my little bootees, or my representation of a felted woolly shroud? (Yes, they really do exist).
 Not forgetting the more familiar uses of felt for decorative art - here is a felted landscaped made with soft felt embellished with needle-felting. It is destined to be a cover for one of my art journals in due course.
A personal favourite use of felt is for jewellery and accessories. Some of these pieces are made from simple wet-felting using merino roving in a range of colours. Other pieces incorporate stitching and embellishments with shisha mirrors and beads. I've also included additional fibres such as silk noil in the cuff, to give added texture.

Felt can, of course, also be stitched and sewn like a fabric. The purse on display is made from pieces of flat felt, cut to a pattern template and stitched. And no felt need be wasted! The small brooch is made from offcuts of an earlier project, this time torn to give more freeform edges then stitched and embellished with a brooch pin on the reverse.
Add caption
When I teach children felting we usually begin with felted balls for bracelets (or caterpillars!) and then make flat felt for purses. But, being a school project, I like to throw in some history and geography too. When I ask about where they can find felt today, Fuzzy Felt is usually the first answer! The students are always amazed to discover that felt is used to make homes, even to this day. They also love to hear anecdotes, such as the origins of "mad as a hatter" (from the extremely harmful mercury used historically in the hatmaking industry).

These are a couple of videos I like to use to illustrate some of the uses of felt....

Making a traditional yurt in Mongolia


The original stetson, made from, yes, you guessed it, felt...(Please note, this process uses rabbit fur)

Thursday, 13 September 2012

Research vs Procrastination

Mauve: How One Man Invented a Colour That Changed the World


...where do you draw the line?

I could fill books with my research, great blogs, websites, books etc. I've found, but I fear that my research is becoming an excuse for not actually doing anything! Will take this as a "note-to-self" kick up the you-know-what and go do something "real"....

Oh, but before I go, seeing as I have spent so long researching, I'll share a couple of my recent finds - blogs, pinterest boards and websites....

Instructables - Tutorials, projects, videos etc. on all kinds of topics.

Mary Lamson-Burke's Teach Me Some Art pinboard on Pinterest - Great links to practical art sites.

Awesome artists - Some great drawing tutorials in an easy-to-digest format.

And find of the day, Julie Fei-Fan Balzer's blog, Balzer Designs. Her Art Journal Every Day dates back to 2011 but has some ideas I really like for breaking that "blank-page-block" amongst other things.

Incidentally, nearly finished reading Mauve - awesome read if you're into the history of colour and the massive impact the invention of synthetic dyes had (and still have) on modern day chemistry.

Tuesday, 11 September 2012

Assignment 1: Reflective Commentary

This first assignment has been a series of bursts of exuberant energy followed by struggling to get going. Looking at the work I've completed, it was no surprise to analyse the gaps and find that they were when sketching or drawing was required. (Um, and rather longer than planned finding the right theme for the blog - oops!).

I think I am developing a little more confidence with picking up a sketchbook and have been doing lots of research on other people's methods for sketchbooks and journalling. I've also found some good resources such as the Sketchbook Challenge for encouragement.

My Pinterest account and Picasa albums are building into a good collection of visual inspiration.
Joining the Textiles Facebook group and engaging with other students via the group is proving a really useful resource - just being able to discuss ideas, plan visits and trips etc. helps to keep me motivated.

In terms of work I have completed so far, highlights have been working with a wide range of materials. In particular, I have (finally) learned that it is both necessary - and possible - to teach oneself to use a new medium (watercolours in my case). This revelation was quite liberating. For some reason I assumed that artists are all naturally proficient in all media when I would never assume that I should instinctively know all textile methods but have to spend time learning them. An interesting statement on my assumptions about fine art and artists. With a bit of luck I'll cut myself a bit more slack and spend more time learning about the media before plunging straight in and expecting to be an instant Da Vinci!

Am I pleased with what I've done? Yes, in the main. I've a long way to go but I'm enjoying the learning progress and pushing myself outside my comfort zone. I'm enjoying the research and collecting, too. I think it will improve my future work.

My approach has always been to go straight into the stitching and do my practising and testing “live”. I am starting to see benefits in taking a step back and putting thoughts, visual images and the like onto paper before I commit to fabric as it is making me think in a more focussed way.

I’m still wrestling with how to structure sketchbooks. I have several on the go at any one time – different sizes and formats – some with themes, others less structured. However, I like to be able to pull images together from different sources so rarely put anything permanently in one place. The bound journal format really doesn’t work for me. Ring binders and photo albums with removable pages have been my preferred choice previously - not as arty or “sexy” but more practical! Online “albums” such as Pinterest are also great for the way I work. I can scan or photograph objects as well as straightforward images and create online, really flexible mood boards. Maybe I’ll need to think about printing off collections as a more physical record?

For the next assignment I’d like to work more with colour and texture, working larger-scale and sketching/journaling more. Onwards and upwards!

Friday, 23 March 2012

Assignment 1: Project Two - Stage Six - using thread and yarns to create textures


For this stage I chose a sketch of a cardoon plant that grows in my in-laws' garden. It is like a huge thistle and reminds me of an old-fashioned shaving brush my grandad used to use.


 I decided to focus in on the top of the plant as it has lots of interesting texture with the feathery "bristles" and thick, scale-like outer shell.


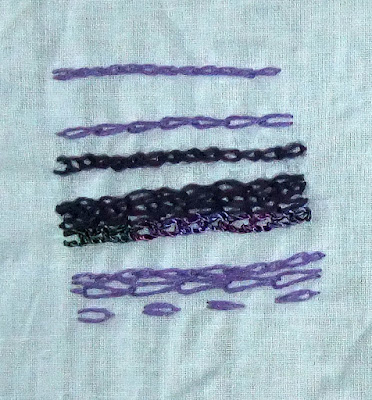
I used a range of threads, embroidery floss, wool, crewel wools. I split the embroidery floss and worked with different numbers of strands to create the feathery effects. I interspersed these with crewel wools so that the light-reflective floss stood out, adding additional texture and depth. The thicker wools reflect the tough outer casing and I added plum-coloured floss to show the colour striations in the "scales". For the background I used a dark-coloured hessian fabric to give a rustic feel.


These photographs of the plant show the key features from different angles.


Learning Log

I feel that the stitching has captured the texture in the plant. Although I used simple straight stitches I found that this was appropriate when combined with using different thicknesses and lengths of stitch. I also split the stitches to create additional texture. 

The source material worked well, having good colour, shape and texture. An alternative would have been to work with the leaves as these also had good texture.

The sketch is not particularly strong, the pencils did not give particularly rich colour. However, when combined with the compositional photos and given that I was primarily concerned with texture and shape, it gave an acceptable basis to work from. 

I enjoyed working with both yarns and stitches to create different textures and I find like both for different reasons depending on the circumstances. Stitch-selection influences the choice of yarn and vice versa. On balance I prefer the use of stitch over yarn as there is greater flexibility and it requires fewer resources!

For example, I have found that a very wide range of textures and stitches can be created with embroidery floss and crewel wool. This is due to the fineness of the thread allowing texture to be built up and many colours can be created by combining fine threads of different colours. Thicker threads can also be made by using several strands at once. This is a good method for subtle shading as in this example using embroidery floss.


Whilst yarns can be a great choice for texture, it is necessary to have a much more wide-ranging stock of source materials. Furthermore, for some textures, thick yarns require heavier fabrics to support the weight as was evident from this sample and my whirlpool galaxy piece.


Project scale also influences the relative importance of stitch vs yarns. For small-scale projects finer threads give greater flexibility. For large-scale projects there is much more scope to explore different yarns and threads and incorporate highly-textured and varied yarns, as well as other handmade "yarns" from fabric strips, plastic etc. These are more difficult to use on a small scale.

In terms of techniques I have barely scratched the surface! I have put together a small travel pack of threads and fabrics so I can practice stitching-on-the-go. I think it will help me to overcome my discomfort with drawing if I can intersperse it with stitch-sketching, starting with the stitch, taking a photo and finishing the stitching later if I don't finish whilst directly observing the source. (I will still be doing more traditional sketching, too!). I've also purchased some seondhand stitch dictionaries for more formal practice. I plan to carry on with my machine-stitch samplers on the Bernina.

A common theme so far is in relation to size. I tend to work on a small scale or lifesize. I'd like to do some larger-scale work as I think it might encourage me to interpret images more freely and less literally.

Friday, 16 March 2012

Assignment 1: Project Two - Developing your marks - Stages 4/5 - Stitches which create texture


For this exercise I chose a range of yarns in the same colour family but with different thicknesses and texture. I also looked for differences in light reflectivity. My selection included thick cotton chenille thread, couched onto the fabric,


couched shiny viscose thread with stitched finer threads, crewel and floss,


 embroidery flosses using variations of a simple straight stitch,


crewel wools and floss and dense, close stitching in satin stitch


and sparkly metallic threads with floss and crewel wool. In this sample I worked by weaving the metallic thread across a "frame" of floss to create a web-like effect. 


Here I've used chain stitch and a combination of floss, viscose and crewel wool, using different stitch sizes and stitching closer together/further apart to create different densities on the fabric.


I can see potential uses for most of these samples; couching the viscose is useful to preserve the shine. It is thick, too, so it prevents damage to the fabric if it is laid on top. Nice curves can be achieved this way and good layering effects.

The simple straight stitch creates a lovely starburst effect just by varying the number and length of stitches that form the "legs" of the star.

Satin stitch is great for dense coverage and neat curves. The dullness of the wool is in contrast with the reflections in the floss.

The webbing was fun and made good use of the sparkle by allowing it to be concentrated in one area but allowing the background to show through. There was more sparkle and less waste by keeping the all of the thread on the front of the work. Again, this could be used for layering to add highlights.

The chain stitch would be useful for landscapes. It reminds me of paths, drystone walls, stones and walkways.

Thursday, 15 March 2012

Assignment 1: Project Two - Developing Your Marks - Stage 3 - A Sample


For this project I selected one of the images from an earlier exercise, the whirpool galaxy. It appealed to me because of the strong spiral shape, the interesting colours and the way the shape stands out from the dark background.


I began collecting my selection of yarns and threads and chose a combination of sparkly threads, embroidery floss and, for the main spiral, a rather bright shiny synthetic novelty yarn. The variegated shading, the sheen and the feathery nature of the novelty yarn nicely reflected what I wanted to recreate with my sample. I worked on a dark background to simulate the dark universe and to let the galaxy really stand out.


I quite like this piece. It would be fun to repeat the exercise on a larger scale, using fine threads to add featheriness and show the finer "veins" of the galaxy. A crushed velvet would be interesting to give an impression of depth but with light/shade as an alternative to the rich, but duller, non-reflective wool.

Tuesday, 13 March 2012

Assignment 1: Project Two - Developing your marks - Stages 1 and 2 - Exploring marks and lines through stitch techniques

I've picked a basic straight stitch for this exercise and have used a variety of different threads and yarns, including embroidery floss, wool, viscose and hand-dyed stranded embroidery cotton, all in shades of greens.

I have also dusted off the trusty Bernina (a 1090 for any Bernina buffs out there) and started working my way through all the different stitches and stitch combinations. I also (deep breath) read the instruction manual. This alone has been a revelation! Although I've used it quite a bit it only really sees the light of day for the usual household jobs like hemming, patching and (very occasionally) a bit of home-sewing - cushions and the like. (Good job I know the DH doesn't read my blog given how much it cost - oops).


I'm amazed by how much it can do that I never realized so this is going to be a great exercise. So far I'm up to stitch 4 of 28. It isn't a swanky computerised affair but has 14 decorative stitches as well as all the normal ones so I've lots still to play with. And the normal stitches are proving interesting in themselves. I'm planning to build my swatches into a nice reference collection so they'll be useful after the course too.