Friday 24 May 2013

Assignment 3 - Project 6 - Stage 4 - Part Three - Raised and Structured Surface Textures - Moulding, Stitching, Knit-felt

This experiment was an attempt to take a soft fabric and recreate a strongly 3-dimensional form. The starting point was a seashell.
White cotton calico was chosen as the fabric as it is pliable but stable and has good crease and fold retention properties. The fabric was dipped in a diluted PVA solution and moulded by hand until it resembled the shell shape. As it dried, more moulding could take place to create the finer details. When the moulded shell was dry it had more definition than I would ideally have liked but retained most of the key shapes.


Thoughts: A finer fabric such as muslin might have been better for retaining finer details of the shape. I'm thinking here of the use of muslin fabrics to make plaster casts. On which point, it would be interesting to repeat this exercise with plaster of paris and muslin.

The next two samples were stitch-based. The first was an experiment with free-machine stitching, something I haven't done much of. I chose a piece of coral, collected while on holiday. It has a fascinatingly complex and detailed surface that I thought would be very challenging to intepret.
I worked on a cotton calico fabric and I was very happy with the result!


For the next piece in this exercise I wanted to work again with stitch but this time in a more 3-D format. I sandwiched a thin layer of polyester wadding in between two pieces of cotton calico. For the design, I used a sketch based on an Indian earring.


I traced the key features of the sketch and photocopied it several times. I then played with various arrangements of the shapes, cutting out sections, simplifying and creating different patterns until I was happy with the level of detail and pattern formation. These were some of the variants.


I finally settled on the following combination as offering an interesting shape, detailed but not too complex and nicely balanced.
I traced the final design, secured the fabric and wadding in an embroidery hoop with the tracing on top and free-machined over the tracing paper.

 Once the design was finished, I ripped away the tracing paper leaving the finished design.
And on removing from the hoop the wadding relaxed giving a softly padded result.
Thoughts: The stitching needs more practice! This was quite a detailed piece and working in a small hoop was quite challenging. Although I like the subtle effect of the stitching using a same-colour thread, it would be interesting to see how using a contrasting thread, or perhaps a metallic thread, would change the overall look.

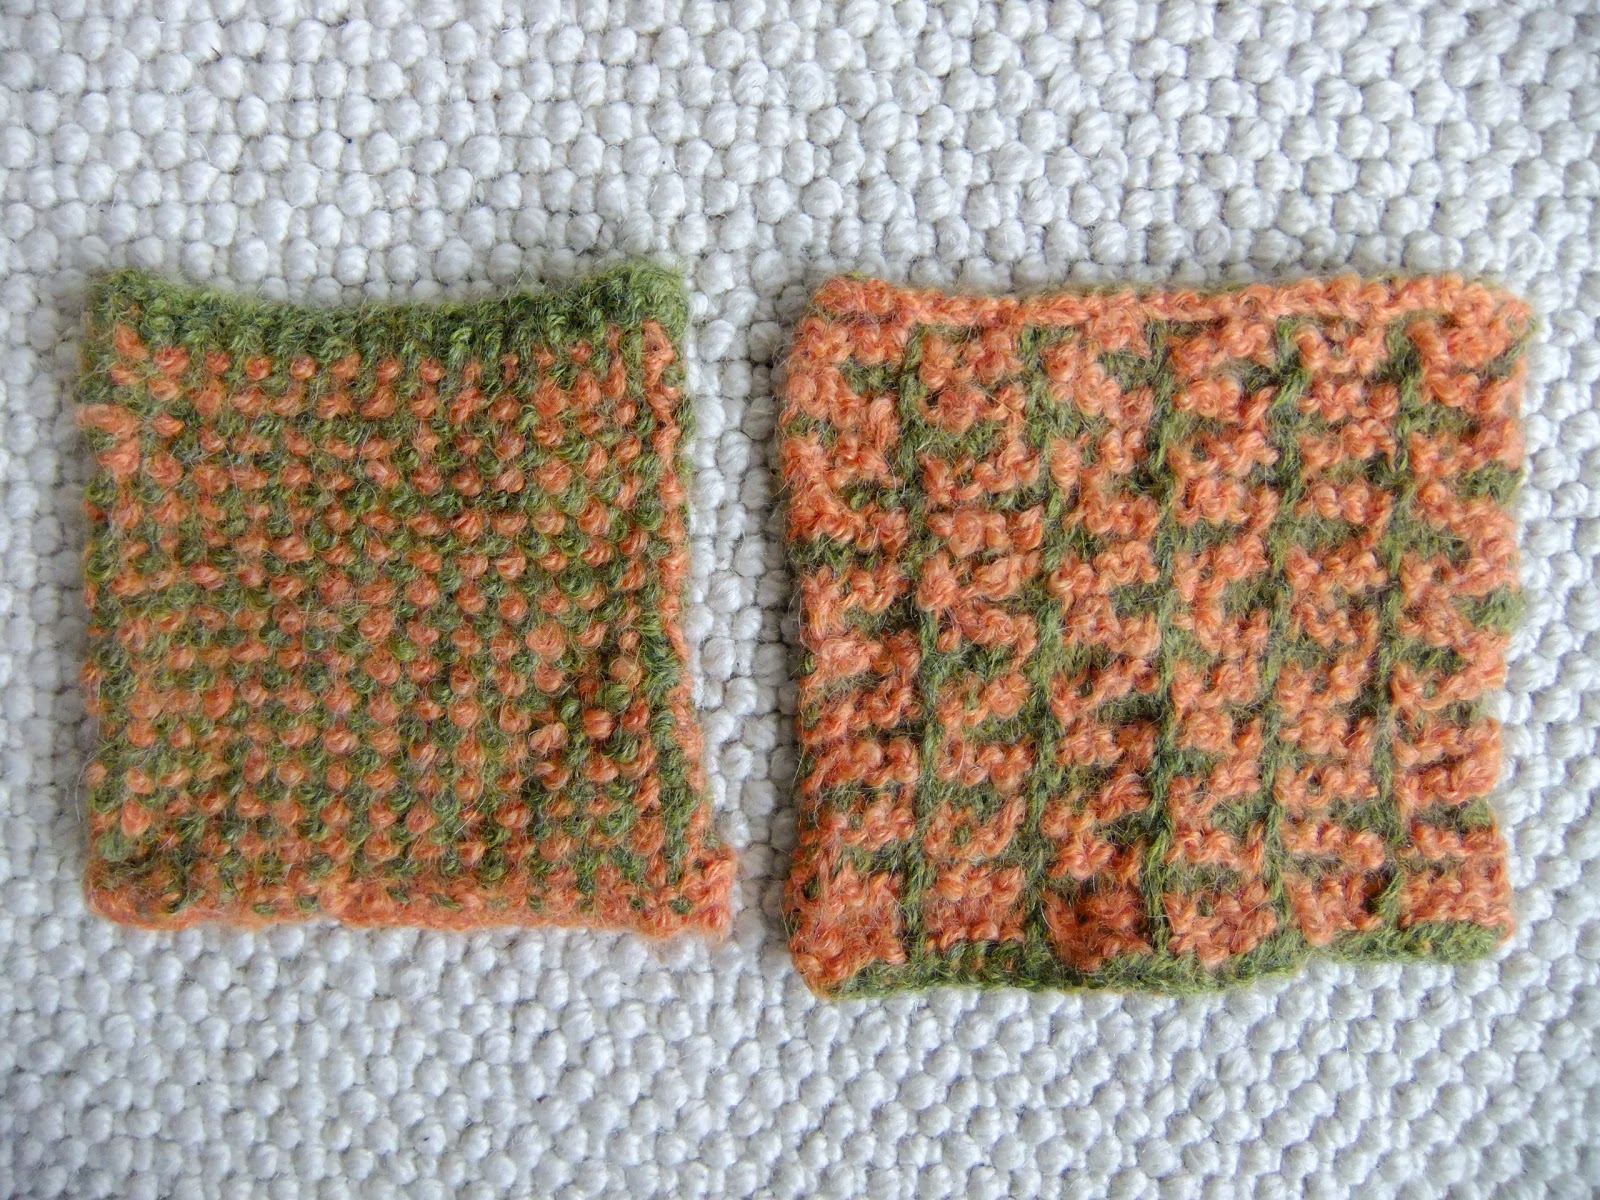
For this stage, I concluded with two samples of fabric that i created from knitted swatches which were subsequently felted in the washing machine. The swatches were knitted in two colours using the mosaic (slipstitch) knitting technique. This creates a springy, firm fabric with a good texture.

Not normally desirable but, having inadvertently felted a pair of hand-knitted socks in the washing machine, I have since been experimenting with the idea of knitting as a fabric that can be sewn, cut and treated more like a traditional woven structure.

For these samples I chose alpaca which isn't the traditional fibre of choice for felting having structure more akin to hair (protein-based with no lanolin and a hollow core). Merino is the most popular due to the fine micron count and short staple allowing for easy interlocking of the fibres. However, I knew from past experience that if the water is hot enough and there is sufficient agitation, it produces and excellent fabric. UK washing machines are not ideal for felting as they generally have a wash cycle that can't be interrupted to check the degree of felting. Old-style, top-loading UK machines are still much more common in the US and these are much better as the cycle can be interrupted at any time and hotter water added, more soap etc. This gives much greater control over the density and drape of the fabric that can be achieved.

Nonetheless, I gave it a try and found that two hot washes were required to achieve the firm, dense fabric I was looking for in these pieces. There is undoubtedly endless scope for further experimentation, however, it could prove costly as, once felted, the process cannot of course be reversed! Hand-felting knits is possible, but there is often damage to the surface of the fibre due to the rolling and rubbing necessary to achieve felting (it also takes ages!). I think I shall have to scour freegle for an old toploader!


Thursday 23 May 2013

Assignment 3 - Project 6 - Stage 4 - Part Two - Raised and Structured Surface Textures - Stitching, folding and devore

My next set of experiments was based around stitching, folding and pleating. A collection of recycled clothing fabric collected and arranged then stitched to create pockets and layers.

Next, I cut up some stockings and stuffed these with stuffing then tied and stitched them to create an interesting 3-dimensional structure.
Research point: This technique would be interesting to integrate with some of the other stitching techniques. 3-D sculptures could also be made, possibly incorporating armatures. It could also be used to build up surfaces with stitched layers of fabric on top.


Another interesting textile product was used for the next project. Fibre-etch is a discharge liquid used for devore and similar techniques where the fabric is chemically burned away to leave a permanent pattern on the fabric. Silk velvet is a particularly good subject for this technique as the pile is quite distinctive from the background fabric.

I hand-dyed a piece of silk velvet for this sample using Procion fibre reactive dyes and a cold water dyeing method. Dyes were dissolved in water and applied at random using squirty bottles to the damp fabric which had been pre-soaked in an alkali (sodium carbonate). The fabric was left overnight then rinsed and allowed to dry.
I used a stencil from an earlier project for this sample, painting the Fiber-etch onto the fabric using the stencil as a template. I created a new pattern by re-arranging the stencil and repeating the application process.


After leaving the Fiber-etch in place for around 15 minutes, it was rinsed off. The velvet pile came away where the Fiber-etch had been applied, leaving a 3-dimensional effect.


Thoughts: Unfortunately, I must have left the Fiber-etch on for too long as the product completely ate away the background fabric in places which wasn't the effect I was aiming for. In areas where the process had been successful it gave nice crisp edges to the burnt away areas and created really pleasing effects. Clearly there is a need to practice with a) timing, b) amount of product used and c) the durability of the fabric being used.

Further research: A further use for this product might be deliberately to burn away the entire fabric, however, this would most likely need to be stablised with stitching to prevent fraying or further burnout.

I also experimented with Fiber-etch on a much stronger, cotton and linen furnishing fabric.
 Despite leaving the fabric for much longer (45 mins) it was noticeable that the fabric was much harder to burnt out (supporting conclusion c) above). Without a distinct background (unlike the velvet where the pile is cotton, the background silk) the fibre did indeed burn away completely (also supporting my theory above).
 In most cases I had to rip the fabric to really open up and there was some fraying, although this was an intentional result to give the fabric a rustic feel.


I completed the piece by adding roughly cut strips of the same fabric and weaving these through the burnt out holes.


I also experimented with stitched surface texture:
Pleating - plain cotton fabric and white cotton stitching to create tight, narrow pleats.


Stitching and drawn thread on fine, grey chiffon. This was interesting as the fabric already had a differential weave with thicker and finer sections.


I also took two very different materials, nylon stocking fabric and roughly-cut strips of a polyester satin lining fabric. I stretched the nylon over an embroidery hoop to give it sufficient tension to carry out a "hooky-proggy" locker-hooking style embellishment. I used a locker hook to poke narrow strips of the poly satin through the fabric. I took my inspiration from the air plant I had used in earlier projects as I thought this method of fabric manipulation would replicate highly textural qualities of the air plant. The shape and the textures of the loops did capture what I was looking for, however, an unexpected bonus was that the fabric naturally frayed giving softer, fuzzy edges. This proved to be very successful in capturing the many fine lines of the air plant that I hadn't anticipated. Normally I prefer fabrics that don't fray so this will be an interesting property to explore further in future projects.


Assignment 3 - Project 6 - Stage 4 - Part One - Raised and Structured Surface Textures - 3D fabric medium

For this stage of the project I wanted to try some techniques that weren't based around stitching as well as some more familiar surface texturing with stitch. I'd seen 3-Dimensional Fabric Medium being demonstrated at an exhibition in Colne with Empress Mills and as I've never used it I thought I'd see what it could do.
Based on some YouTube research, a couple of my favourite textile books and the instructions, I got my materials together and started with some completely random application of the medium. Once it was more or less dry, I pinned it out onto a foam mat and held an iron over it to make the medium expanded. Just as well I did as it really tried to shrink in as the medium expanded and the fabric puckered. The results were interesting and I could see some potential for landscapes or similar natural structures using the random technique. (The medium was applied with a thick brush and just brushed on).
I decided to see how the medium might be used on more planned shapes. Not sure whether it was such a good idea (for the longevity of the stamp!), I painted a hard rubber stamp and printed medium onto fabric.
The pressure of the printing process must have squeezed the medium into the relief areas of the stamp as it created fine lines of puffed textured with flat areas where the print surface of the stamp would normally be. Interesting but not what I'd expected! I think this could be exploited further by making my own stamps (maybe lino cut?) and taking a completely different approach to the stamping process, aiming for the areas of relief to be as important as the print area.
The back of the fabric (glazed cotton) was interesting as the medium had pulled the fabric in, creating a concave shape. The shape was actually more even on the reverse.
I continued to experiment, using a synthetic flock fabric and painting over the shapes. I also added some procion dye powder to the medium to see how it would take colour. This was not particularly satisfying but the dye did create a coloured medium.
A coloured paint onto fine muslin saw the medium transfer to the parchment paper below. Research point: Perhaps this could be exploited with a second layer of fabric below to give two "prints"? (Or maybe the fabric layers would simply stick together?)
My final experiments with the medium were on a piece of cotton velvet to see how the medium interacted with the velvet pile. I had a couple of cookie cutters that I held over the fabric and painted a thick layer of medium (uncoloured) with a brush.
After heating the medium, being applied more thickly, gave a much more satisfying raised texture. Clearly, for even "raising", even and quite solid application is required. The pile didn't appear to affect the performance of the medium and gave an interesting contrast of textures. Research point: This could be further exploited with other textured fabrics, sateens, rough silks etc.
The reverse was a good, solid impression of the images, but probably a lot of work for a relatively unexciting result.