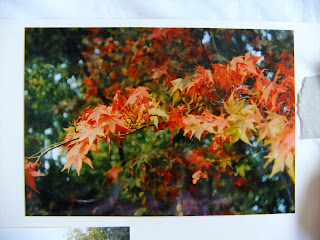
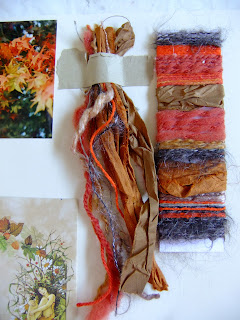
Given the time of year it's no surprise that for this project I was inspired by the theme of Autumn. I gathered a selection of images, my own photos, an envelope for a gift card, sourced images and assembled these into two mood boards.
I used the mood boards as a basis to collect together a range of materials that to me were expressions of autumn, either in terms of colour, texture, or both. This included slubby natural and synthetic yarns, handspun, hand-dyed yarn and fibres, twine, hessian fabric, fabric ribbon remnants, leftover "pipes" from the Steampunk book cover in project 7.
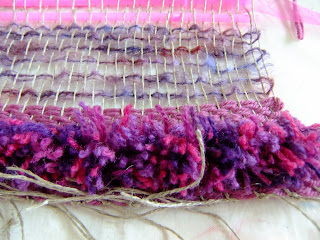
For this piece I chose to work intuitively in interpreting the mood boards, selecting materials in a way that felt satisfying and interesting. I began with plain weave using a variegated mohair boucle for damp undergrowth, added a raw silk in bright orange as autumnal falling leaves mulching into the soil, then returned to the brown boucle. I cut short lengths of hemp yarn and randomly added these to the weave using Ghiordes Knots to create a feeling of dry twigs. I've left these long and looped but may cut them at some point later once I've had the chance to let the piece settle.
I used a range of textured yarns, ribbon and hand-dyed yarn to create a deep pile of fallen autumn leaves, ripe for kicking up while out walking on a crisp autumn day!
I incorporated two "branches" of fabric-wrapped straws (left over from the Steampunk cover). Handspun boucle yarn and a hand-dyed tussah silk were used to create leaves and I left open warp around them to give the impression that the leaves were still falling from the tree. To stabilise the warps I completed the piece with bands of orange silk and brown mohair.
I cut the piece off the warp and tied the warp (hemp yarn) in knotted pairs.
Thoughts:
This piece looked promising when on the loom but when taken off, it quickly became clear that the open warps were far too flimsy and the weaving has lost all structure which is a shame as I like the shapes, textures and tonal qualities. The "pipes" haven't really worked at all, being too rigid and difficult to anchor in place.
Actions:
I think it would be worth revisiting this piece, taking into account the issues encountered above, using a different warp or lighter materials. On reflection this piece has the feeling of an immoveable force meeting an irresistible object. I was simply too stubborn to recognise what wasn't working and failed completely to predict what would happen when the piece came off the loom. Clearly this is an important learning exercise and as a novice weaver, I have much to learn!
(Note to self: Would it be possible to rescue the piece by mounting onto fabric, possibly a dyed pre-felt, stitching into it to add strength? Or re-stretching and stiffening the warp or even re-mounting on a pin-board and filling in the gaps?)
Showing posts with label Woven Structures. Show all posts
Showing posts with label Woven Structures. Show all posts
Tuesday, 19 November 2013
Assignment 4 - Project 9 - Woven Structures - Stage 3 - Part Two - Experimenting with Different Materials
(DISPLAY BOARD PIECE - BOARD 6 OF 10)
For this sample I decided to develop one of the pieces I prepared for the interlude. The collaged images were originally inspired by the word "Bleak" and I assembled a range of yarns and other materials to reflect one of the images. From the collage I created the preparatory yarn wrap.
The resulting piece aims to recreate the image. However, I originally made the wrap assuming following the lower edge working right to left. For this reason, the mounting on the board is arguably upside down!
On reflection, I think the piece works better working left to right across the lower edge, anchoring the heavier, more solid elements at the bottom of the piece. Looking at it afresh, with the wool and plastic at the top it seems top-heavy so I think it should be displayed the other way up. (Interestingly, I wove it following the colours and textures in the image left to right).
Starting with a rough grey Herdwick wool (a hill sheep specially adapted to living in the bleak, harsh conditions in areas such as the North Lakes so very appropriate). This represented the rough, snow-covered ground.
Grey, biodegradable, recycled packaging bags for the fencing.
More wool to anchor the plastic and create more rough, snowy ground, followed by a layer of loosely woven waste synthetic quilt wadding. This made great snow.
A black and grey boucle yarn and a deeper grey wool were woven together using a curved weft to create undulating snowy/gravelly ground. Next I added two rows of Soumak using strips of soft, sheer polyester fabric remnants. A further layer of snowy boucle scrub leads into a final sturdy layer of denser hedgerow.
Thoughts:
My first thought here is about the longevity of the piece. In using a biodegradable plastic I've probably given myself a bit of an issue in the longterm. Next time I'd either use a less environmentally friendly plastic or swap this for a different material, perhaps a grey/black tweed or similar wool-based variegated fabric.
There is some visible hemp warp here but it blends well with the other colours in the piece, giving the impression of rough grass stalks. It also needed to be sturdy to hold the stronger materials such as fabric, plastic and strong wool. A finer warp might have frayed or broken.
The upside-down mounting aside, I really like this piece. The monotone colour scheme creates harmony and the different materials give texture and interest. My piece isn't perhaps quite as bleak as my images but it still works well for me. Using an abstract concept was an interesting thing to interpret as a woven piece.
Action points:
Consider materials used and any specific needs. Using a short-life plastic for a piece that may be expected to have to last a number of years in a display setting, particularly, for example, if mounted outside or in bright sunlight would be potentially disastrous.
Although I had evaluated my yarns and done a yarn wrap, a smaller sample weave or additional wraps would have most likely flagged up the issues with the proportions of the various materials. I need to take more time to sample and resist the urge to get straight into a project.
Monday, 18 November 2013
Assignment 4 - Project 9 - Woven Structures - Stage 3 - Part One - Experimenting with Different Materials
(DISPLAY BOARD PIECE - BOARD 5 OF 10)
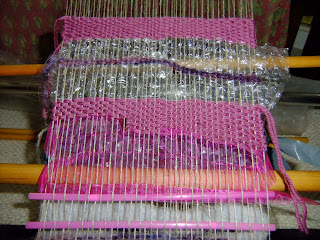
This second attempt at warping was far more successful - quicker and right first time! Warping correctly gave a little over a metre of continuous warp to work with. I made individual looped heddles made from short lengths of knotted hemp (the warp was also hemp) which took a while but these will be re-usable and it was easier to maintain the tension on the warps than it was when wrapping a single thread around the heddle dowels.
For this piece I worked with a colour range of pinks, purples and greys using wools and a number of more unusual materials, plastic bubble wrap, straws, plastic, fabric and wadding.
Thoughts:
It was fun to work with a variety of materials, however, more attention is required when tensioning the weft. As I left some of the warp open, I would have to consider whether it would be necessary to fix the wefts in place in some way to prevent the wefts sliding out of place.
I have done this by painting the wefts with dilute pva in the past so this is something I might try. The tricky part would be any textured yarns and avoiding flattening or spoiling the textural qualities in the wefts. (Perhaps focussing on fixing on the warps above and below the weft threads?).
The bubble wrap was particularly interesting and refracted the light well. This could be used successfully to add light, reflections or sparkle. Being translucent, of course, care would need to be taken with the colour of the warp. (Is there a translucent fibre that would be strong enough as a warp or are all translucent threads too stretchy?).
The straws were fun but I can't see an immediate use for these as to me they looked too much like, well, straws.
Action points
Warping is a long process and I could have tried a smaller sample on cardboard (as in the earlier exercise) to see how these materials interacted before I committed myself. This could have been a time-consuming mistake in a larger piece.
I think I should also consider whether using unusual materials such as straws really works and not include them just because they are unusual. Having the confidence to go back and re-work or remove parts of a design that doesn't work is something I should be seeking to develop. Again, more sampling would have helped as maybe a different style of weave above and between the straws might have made the design work better.
Subscribe to:
Posts (Atom)


