Showing posts with label Project 6. Show all posts

Monday, 3 June 2013

Assignment 3 - Project 6 - Reflective Journal - What Have You Achieved?

Did you prefer working with fabric in this way to working directly with stitch? If so, can you explain why?
Working with stitch is very satisfying, however, being able to work in fully a 3-dimensional environment, using both stitch and fabric manipulation to make new structures is stretching and gives many new possibilities.

Do you feel pleased with the shapes and movements that you have created in both applique and fabric manipulation? What would you want to change or try again in a different way?
A number of the samples were successful - I really liked the undersea piece (purples and blues with net overlay). The layering captured the feeling I was looking for - looking into the depths of the ocean. Likewise, although the free-machine coral was a small piece, the result was pleasing and I felt captured the key features of the coral. Free-machining is very satisfying!

Using different fabrics in the appliqued "deserted house" was fun. I can see the scope for extending this into lots of different projects.

I particularly liked the woven green/yellow fabric using devore to create the weaving grid. The devore could have been replaced with a sharp knife as it wasn't particularly effective but the seersucker of the fabric combined with the stripes and the interaction of the rough edges and weave made it interesting and tactile.

The work with the silk velvet wasn't particularly successful but I learned a lot about the technique and will be experimenting further to perfect this technique. The interaction of the texture of the velvet, the rich colours of the dye and the relief effects created by the devore are very satisfying and there is lots of scope for further development.

How did the pieces work in relation to your drawings? Did the fabric manipulation technique take over and dictate the final result?
Interpreting drawings into collages was a good exercise. It was suprising how, when viewed from a distance, the correct balance and positioning of colours and captured the essence of the drawings.

Was it helpful to work from the drawings in the applique exercise? Would you have preferred to play directly with cut shapes and materials?
I felt that the quilted piece based on the earring was a logical and structured interpretation of the sketch, even if the finished result bore little resemblance to it! It was very interesting to look back and see the development of the final piece.

I would have been equally happy to work from cut shapes and can see the benefits of both approaches. Sometimes inspiration comes simply from play with no prior assumptions. It can be harder to break away from replicating an image and think freely when you have a given starting point.

How do you feel about working with stitch in general? Is it an area you would like to pursue in more depth? Do you find it limiting in any way?
I enjoy working with stitch but I like to combine it with other techniques such as print and surface texture. Working with textile products such as Fiber-etch and moulding pastes extends the range of  possibilities for really sculptural and imaginative textile art. Stitch can be time-consuming so effects that I would like to create such as using stitch as paint/french knots etc. are sometimes sidelined in favour of a more dramatic, speedier result. This can be particularly important when considerations of commissions and pricing etc. are in point.

Final Piece


 Can you see a continuous thread of development from your original drawings and samples to the final designs?
Based on my selection of photographs, many of which came from visits to science museums so I could see cutaways of the workings of machinery, and the research from Steampunk sites and magazines, I am pleased with the progress of this design. The starting point was the small sketch I produced in Assignment 2. It was taken from an image in a catalogue for an Art Deco exhibition that I attended at the V&A in 2003.


The imagery of cogs, gears, metal and chainwork in this oranate gate was married up with imagery taken from visits to the Museum of Science and Industry, York Railway Museum, Quarry Bank Mill and Armley Mills Industrial Museum amongst others. Visits to Steampunk fairs and research on the internet gave more ideas as to how to pull everything together into my Steampunk-themed book cover.

Do you feel you made the right decisions at each stage of the design process? If not, can you say what changes you would make? 
There are aspects to this design that I would perhaps change. Firstly, the design is too open. Steampunk is a very busy, intense style with masses of interest, dense texture and detail. A Steampunk object should keep you engaged for a long time, seeing different things each time you look at it. This was my first large-scale interpretation of this theme and next time I would be more confident in incorporating lots more detail, in particular textural content, small "objets" and more metallic items (from keys to gaskets to wire etc.).

Were you able to interpret your ideas well within the techniques and materials you chose to work with?
The finished piece looks too modern. In a future piece I would consider using metallic sprays and metallic paints (possibly car paint spray or textured metallic paint such as Hammerite?) and investigating how to distress the components to give an old, reconstructed feel.

How successful is your final design in terms of being inventive within the medium and coherent as a whole?
I feel that the finished piece has a balanced composition and shows a range of materials and techniques. Unusual components (coins, cds etc.) have been used creatively and combined with more familiar materials such as fabrics.

Did you enjoy working the piece? Is it a good intepretation of your idea, and do you like it?
Yes, I very much enjoyed making it. I doubt it would make the grade as far as true Steampunk artists and enthusiasts are concerned but I do like the finished piece. It was challenging and exciting working out how to incorporate diverse, non-traditional materials into a textile-based project. For a first piece, I think it was a good start and something I'd like to do more of. I can see much collecting of rusty nuts, keys and bolts in my future!

Overall, it had some good components (found objets, leather, metal, etc.) but just needed more - more detail, more texture and more grunge!

For lots more images, see my Picasa album here

Sunday, 2 June 2013

Assignment 3 - Project 6 - Stage 4 - Final Piece - Steampunk Book Cover - part two - assembly

Armed with sketches, research and a good selection of materials I began to try out some arrangements. These were a couple of possibilities that didn't make the final cut...


The fabric ribbon was too fussy where it was (although I found a use for this later). I couldn't readily work out a way to attach the bottle caps and rivets securely (bearing mind that this will be a well-used project when it's finished). The wooden curtain rail ring was also rejected as being too bulky and not really in keeping with the steampunk theme.

Once I'd decided on the layout, I started with the base layer of mixed fabrics, machine-stitching them together first. I used rough hessian, an interesting surface-woven velour and a piece of cotton calico which I'd first distressed by soaking over two old iron weights to give a rusted effect. I machine-stitched the finished front to a separate piece of golden sateen to cover the hinge and create a pocket so the cover would slide over the board.
I added cds for the cogs, copper coins for the smaller cogs and a piece of knotted metal cord to wind between the coins as chainlink. (The wooden hoop and bottle caps shown here on the cds were later rejected).
To give the cds the appearance of toothed cogs, I wrapped them with thick strips of the roughly cut viscose ribbon originally rejected. Foil covers for chocolate coins replace the bottle caps in the centre of the cds.
For the copper piping, I covered plastic drinking straws with copper-coloured viscose ribbon.

.
I used scraps of waste leather to create corner reinforcements and stitched these in place.
 For the large metal piping, I printed out an image from my source images onto thick paper. I laid wadding underneath and stitched through this to attach the "pipe" to the fabric, following the lines created by the riveting to give a more 3-d impression.

For the smaller cogs, I wound a metallic chainlink cord around a series of coins to create the impression of an integrated mechanism. Although this was all glued in place, it didn't feel secure so I used metallic mesh as an overlay and stitched it in place. This created an impression of viewing moving parts from behind a grille. I liked the way this made the coins look less like coins and more like the cogs they were intended to represent by softening the outline of the smaller parts. It also brought the piping into relief, adding depth.


Somewhat frustratingly I didn't take a photograph of the finished cover before I sent it off but here's the most complete version. I'll post a proper one later with the evaluation.

Saturday, 1 June 2013

Assignment 3 - Project 6 - Stage 4 - Final Piece - Steampunk Book Cover - part one - prep

(DISPLAY PIECE)
(NOTE: SENT UNMOUNTED DUE TO SIZE/WEIGHT)

I love Steampunk art. All those gears and cogs, rusty metal, chains and things that go clunk are quite magical. I think perhaps it reminds me of Mousetrap for grown-ups (which was my favourite board game)!
So for my personal piece I decided to produce a journal cover, styled in the steampunk tradition.
Steampunk is Victorian-esque, Art Nouveau, mechanical, past and future, science fiction, copper pipe, keys, cogs, clocks and timepieces, valves, gears, leather and, of course, steam-powered! Here are a couple of visual mind-maps I put together when coming up with ideas for my project.


From these I pulled the following images as the basis for my piece.


I found an old wallpaper sample book (a bit larger than A3 size) with really sturdy board covers and a strong cord handle. I think I can re-use the fasteners that held the pages in place, which will be great for storing sketches and journal material (the spine is about 8cm deep!).
I raided my stash for a good range of Steampunk colours, materials, shapes and textures. I included an eclectic range of fabrics, threads and yarns.


I also added lots of interesting "found objects" - coins, straws, mesh, bottle caps, rivets, wire and a couple of old cds.

I sketched out a rough idea of the shapes I wanted to create with some notes on how to replicate them.


Coming soon - part two - assembly.....

Friday, 24 May 2013

Assignment 3 - Project 6 - Stage 4 - Part Three - Raised and Structured Surface Textures - Moulding, Stitching, Knit-felt

This experiment was an attempt to take a soft fabric and recreate a strongly 3-dimensional form. The starting point was a seashell.
White cotton calico was chosen as the fabric as it is pliable but stable and has good crease and fold retention properties. The fabric was dipped in a diluted PVA solution and moulded by hand until it resembled the shell shape. As it dried, more moulding could take place to create the finer details. When the moulded shell was dry it had more definition than I would ideally have liked but retained most of the key shapes.


Thoughts: A finer fabric such as muslin might have been better for retaining finer details of the shape. I'm thinking here of the use of muslin fabrics to make plaster casts. On which point, it would be interesting to repeat this exercise with plaster of paris and muslin.

The next two samples were stitch-based. The first was an experiment with free-machine stitching, something I haven't done much of. I chose a piece of coral, collected while on holiday. It has a fascinatingly complex and detailed surface that I thought would be very challenging to intepret.
I worked on a cotton calico fabric and I was very happy with the result!


For the next piece in this exercise I wanted to work again with stitch but this time in a more 3-D format. I sandwiched a thin layer of polyester wadding in between two pieces of cotton calico. For the design, I used a sketch based on an Indian earring.


I traced the key features of the sketch and photocopied it several times. I then played with various arrangements of the shapes, cutting out sections, simplifying and creating different patterns until I was happy with the level of detail and pattern formation. These were some of the variants.


I finally settled on the following combination as offering an interesting shape, detailed but not too complex and nicely balanced.
I traced the final design, secured the fabric and wadding in an embroidery hoop with the tracing on top and free-machined over the tracing paper.

 Once the design was finished, I ripped away the tracing paper leaving the finished design.
And on removing from the hoop the wadding relaxed giving a softly padded result.
Thoughts: The stitching needs more practice! This was quite a detailed piece and working in a small hoop was quite challenging. Although I like the subtle effect of the stitching using a same-colour thread, it would be interesting to see how using a contrasting thread, or perhaps a metallic thread, would change the overall look.

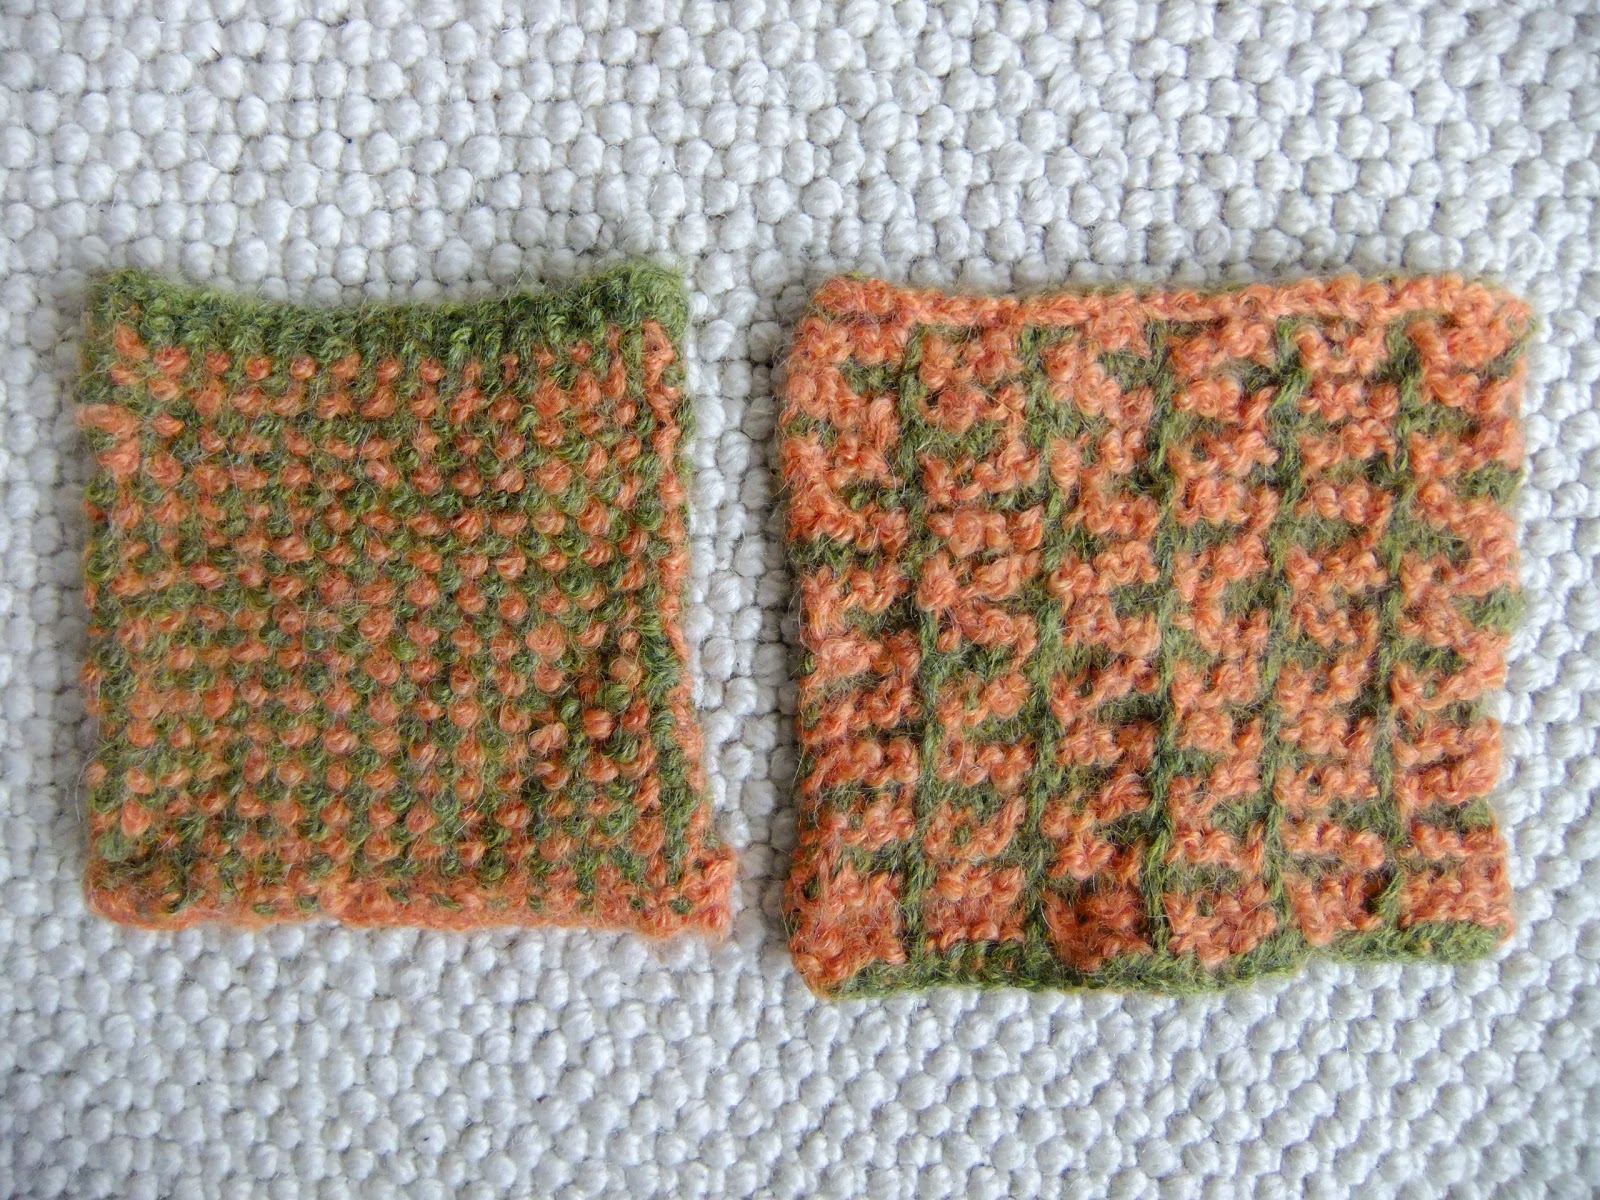
For this stage, I concluded with two samples of fabric that i created from knitted swatches which were subsequently felted in the washing machine. The swatches were knitted in two colours using the mosaic (slipstitch) knitting technique. This creates a springy, firm fabric with a good texture.

Not normally desirable but, having inadvertently felted a pair of hand-knitted socks in the washing machine, I have since been experimenting with the idea of knitting as a fabric that can be sewn, cut and treated more like a traditional woven structure.

For these samples I chose alpaca which isn't the traditional fibre of choice for felting having structure more akin to hair (protein-based with no lanolin and a hollow core). Merino is the most popular due to the fine micron count and short staple allowing for easy interlocking of the fibres. However, I knew from past experience that if the water is hot enough and there is sufficient agitation, it produces and excellent fabric. UK washing machines are not ideal for felting as they generally have a wash cycle that can't be interrupted to check the degree of felting. Old-style, top-loading UK machines are still much more common in the US and these are much better as the cycle can be interrupted at any time and hotter water added, more soap etc. This gives much greater control over the density and drape of the fabric that can be achieved.

Nonetheless, I gave it a try and found that two hot washes were required to achieve the firm, dense fabric I was looking for in these pieces. There is undoubtedly endless scope for further experimentation, however, it could prove costly as, once felted, the process cannot of course be reversed! Hand-felting knits is possible, but there is often damage to the surface of the fibre due to the rolling and rubbing necessary to achieve felting (it also takes ages!). I think I shall have to scour freegle for an old toploader!