Friday, 23 March 2012
Assignment 1: Project Two - Stage Six - using thread and yarns to create textures
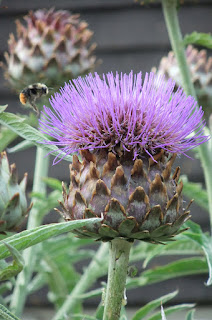
For this stage I chose a sketch of a cardoon plant that grows in my in-laws' garden. It is like a huge thistle and reminds me of an old-fashioned shaving brush my grandad used to use.
I decided to focus in on the top of the plant as it has lots of interesting texture with the feathery "bristles" and thick, scale-like outer shell.
I used a range of threads, embroidery floss, wool, crewel wools. I split the embroidery floss and worked with different numbers of strands to create the feathery effects. I interspersed these with crewel wools so that the light-reflective floss stood out, adding additional texture and depth. The thicker wools reflect the tough outer casing and I added plum-coloured floss to show the colour striations in the "scales". For the background I used a dark-coloured hessian fabric to give a rustic feel.
These photographs of the plant show the key features from different angles.
Learning Log
I feel that the stitching has captured the texture in the plant. Although I used simple straight stitches I found that this was appropriate when combined with using different thicknesses and lengths of stitch. I also split the stitches to create additional texture.
The source material worked well, having good colour, shape and texture. An alternative would have been to work with the leaves as these also had good texture.
The sketch is not particularly strong, the pencils did not give particularly rich colour. However, when combined with the compositional photos and given that I was primarily concerned with texture and shape, it gave an acceptable basis to work from.
I enjoyed working with both yarns and stitches to create different textures and I find like both for different reasons depending on the circumstances. Stitch-selection influences the choice of yarn and vice versa. On balance I prefer the use of stitch over yarn as there is greater flexibility and it requires fewer resources!
For example, I have found that a very wide range of textures and stitches can be created with embroidery floss and crewel wool. This is due to the fineness of the thread allowing texture to be built up and many colours can be created by combining fine threads of different colours. Thicker threads can also be made by using several strands at once. This is a good method for subtle shading as in this example using embroidery floss.
Whilst yarns can be a great choice for texture, it is necessary to have a much more wide-ranging stock of source materials. Furthermore, for some textures, thick yarns require heavier fabrics to support the weight as was evident from this sample and my whirlpool galaxy piece.
Project scale also influences the relative importance of stitch vs yarns. For small-scale projects finer threads give greater flexibility. For large-scale projects there is much more scope to explore different yarns and threads and incorporate highly-textured and varied yarns, as well as other handmade "yarns" from fabric strips, plastic etc. These are more difficult to use on a small scale.
In terms of techniques I have barely scratched the surface! I have put together a small travel pack of threads and fabrics so I can practice stitching-on-the-go. I think it will help me to overcome my discomfort with drawing if I can intersperse it with stitch-sketching, starting with the stitch, taking a photo and finishing the stitching later if I don't finish whilst directly observing the source. (I will still be doing more traditional sketching, too!). I've also purchased some seondhand stitch dictionaries for more formal practice. I plan to carry on with my machine-stitch samplers on the Bernina.
A common theme so far is in relation to size. I tend to work on a small scale or lifesize. I'd like to do some larger-scale work as I think it might encourage me to interpret images more freely and less literally.
Friday, 16 March 2012
Assignment 1: Project Two - Developing your marks - Stages 4/5 - Stitches which create texture
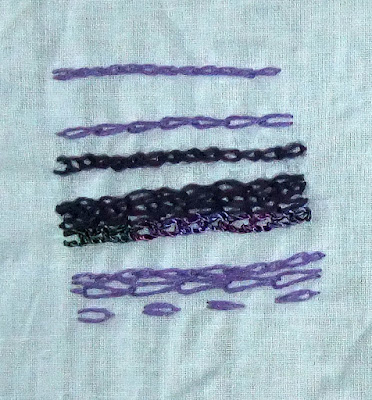
For this exercise I chose a range of yarns in the same colour family but with different thicknesses and texture. I also looked for differences in light reflectivity. My selection included thick cotton chenille thread, couched onto the fabric,
couched shiny viscose thread with stitched finer threads, crewel and floss,
embroidery flosses using variations of a simple straight stitch,
crewel wools and floss and dense, close stitching in satin stitch
and sparkly metallic threads with floss and crewel wool. In this sample I worked by weaving the metallic thread across a "frame" of floss to create a web-like effect.
Here I've used chain stitch and a combination of floss, viscose and crewel wool, using different stitch sizes and stitching closer together/further apart to create different densities on the fabric.
I can see potential uses for most of these samples; couching the viscose is useful to preserve the shine. It is thick, too, so it prevents damage to the fabric if it is laid on top. Nice curves can be achieved this way and good layering effects.
The simple straight stitch creates a lovely starburst effect just by varying the number and length of stitches that form the "legs" of the star.
Satin stitch is great for dense coverage and neat curves. The dullness of the wool is in contrast with the reflections in the floss.
The webbing was fun and made good use of the sparkle by allowing it to be concentrated in one area but allowing the background to show through. There was more sparkle and less waste by keeping the all of the thread on the front of the work. Again, this could be used for layering to add highlights.
The chain stitch would be useful for landscapes. It reminds me of paths, drystone walls, stones and walkways.
Thursday, 15 March 2012
Assignment 1: Project Two - Developing Your Marks - Stage 3 - A Sample
For this project I selected one of the images from an earlier exercise, the whirpool galaxy. It appealed to me because of the strong spiral shape, the interesting colours and the way the shape stands out from the dark background.
I began collecting my selection of yarns and threads and chose a combination of sparkly threads, embroidery floss and, for the main spiral, a rather bright shiny synthetic novelty yarn. The variegated shading, the sheen and the feathery nature of the novelty yarn nicely reflected what I wanted to recreate with my sample. I worked on a dark background to simulate the dark universe and to let the galaxy really stand out.
I quite like this piece. It would be fun to repeat the exercise on a larger scale, using fine threads to add featheriness and show the finer "veins" of the galaxy. A crushed velvet would be interesting to give an impression of depth but with light/shade as an alternative to the rich, but duller, non-reflective wool.
Tuesday, 13 March 2012
Assignment 1: Project Two - Developing your marks - Stages 1 and 2 - Exploring marks and lines through stitch techniques
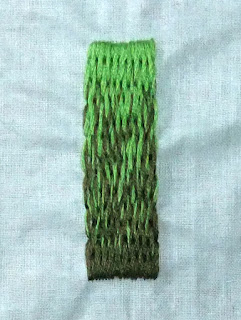
I've picked a basic straight stitch for this exercise and have used a variety of different threads and yarns, including embroidery floss, wool, viscose and hand-dyed stranded embroidery cotton, all in shades of greens.
I have also dusted off the trusty Bernina (a 1090 for any Bernina buffs out there) and started working my way through all the different stitches and stitch combinations. I also (deep breath) read the instruction manual. This alone has been a revelation! Although I've used it quite a bit it only really sees the light of day for the usual household jobs like hemming, patching and (very occasionally) a bit of home-sewing - cushions and the like. (Good job I know the DH doesn't read my blog given how much it cost - oops).
I'm amazed by how much it can do that I never realized so this is going to be a great exercise. So far I'm up to stitch 4 of 28. It isn't a swanky computerised affair but has 14 decorative stitches as well as all the normal ones so I've lots still to play with. And the normal stitches are proving interesting in themselves. I'm planning to build my swatches into a nice reference collection so they'll be useful after the course too.
Sunday, 11 March 2012
Assignment 1: Project One Learning Log
This has been an interesting series of exercises. My experience of drawing has been more focussed on accurately representing whatever I am drawing/painting so working with just words as the inspiration was quite liberating. There was no "right" or "wrong" or feeling of having failed to draw something realistically. I feel that my use of different marks was initially quite limited but expanded as the exercises progressed.
I found a surprising range of media to work with and enjoyed working with all of them.
With most of the exercises I found at least one example that I was pleased with. It was interesting that by putting the samples to one side and re-visiting them later I found them more satisfactory after a short break! This has definitely made me more confident.
The most satisfying exercise was Stage 3, interpreting the textures using different media. Overall my favourite pieces were the nebula and the coral. I think this was bacause I matched the media well to the images to capture the textures and created several interpretations that I could see translating into a textile-based project.
My favourite media was probably the aquarelle pencils for versatility. The watercolours were a surprise pleasure as I haven't been very successful with using watercolours previously (I did invest in a book about how to use watercolours so this probably helped!). The pastels were lovely for richness of colour but I need more practice controlling them!
I think there is more scope to explore printing, rubbings and uisng combinations of different media.
Subscribe to:
Posts (Atom)


